
Launch Windows Update, then Adjust Update Parameters
You may have recently installed Windows 10, but there may still be some updates available. To ensure your system has the most recent security fixes, you should install them.
To accomplish this, click the gear symbol on the Start menu or the Win + I shortcut to launch the Settings programme, then select Update & Security > Windows Update. Click Check for updates on this page. It will start downloading and installing updates, if any, in a short while. If any of them need to be restarted, you’ll be prompted to do so.
In Windows 10, Windows Update is executed automatically. This saves you manual labour, but it can also be annoying if it keeps interrupting you.
Verify That Windows Is Activated
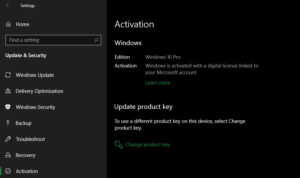
Without a working licence, installing Windows 10 is simple. To utilise all of Windows’ features, you should activate it right away if you didn’t provide a licence key or log into a Microsoft account that has a digital licence during the setup process.
To find out if you’ve activated Windows yet, navigate to Settings > Update & Security > Activation. If so, you’re good to go. If not, you’ll have to input a licence key or log into your Microsoft account.
Update Your Softwares/Drivers
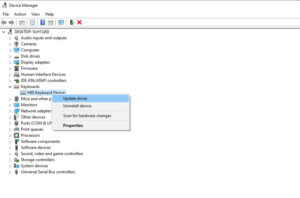
Device drivers are specialised programmes that let Windows interface with the hardware on your computer in an appropriate manner. Although most hardware manufacturers supply them, they aren’t always flawless, much like most software. They occasionally have bugs or don’t receive updates to make them compatible with the most recent Windows versions.
Most drivers don’t require much attention; in general, if they’re functioning, upgrading them won’t put you at danger of breaking anything. That being said, installing the correct drivers is a crucial initial step when configuring Windows. For devices like keyboards and mice, Windows will install generic drivers automatically; nevertheless, you need know how to install other necessary drivers, which do require semi-regular updates.
Install Required Windows Applications
While many of the greatest Windows applications aren’t pre-installed, Windows 10 does come with several fundamental apps for various uses. We have a comprehensive tutorial available that walks you through installing the Windows programme immediately. Check out our suggestions in areas such as communications, picture editing, security, and browsers on that list.
With the correct tools at your disposal, your experience—whether you recently completed a full reset or are just getting started with Windows 10—will be much better.
Modify the Windows Default Configuration
The default settings of Windows 10 aren’t ideal for every user. They work, but you’ll probably get better results if you make some adjustments. After installing Windows 10, there are many things to alter in the Settings programme. For now, let’s concentrate on a few important recommended modifications.
Modify Windows Default Applications
Your favourite applications should be set to open files by default after you’ve installed them. To modify the applications that Windows 10 use for different functions, take the following actions:
- Navigate to Settings > Default Apps > Apps.
- Choose your favourite programmes, such as the web browser, music player, email, and more, for each category.
- If you want to link different file formats, such PDF, DOCX, and TXT, to certain applications, go to Choose default apps by file type, which is located under that.
- Select Set defaults by app to see in a different format. You may select an application from this list to view the settings that it currently has and is capable of using.
Turn off any unnecessary startup items
A lot of programmes configure themselves to run automatically at startup, wasting resources and increasing the time it takes for your computer to load up. Once the software of your choice has been installed, you should ensure that only authorised apps launch at boot.
- You may use Ctrl + Shift + Esc to open the Task Manager or you can right-click on the taskbar and select Task Manager.
- If necessary, click More information to go to the full view.
- Navigate to the Startup tab.
- To stop an app from starting automatically when it boots up, right-click on each one and choose Disable.
Enhance Power Plan Configurations
With Windows 10, you may adjust several components of the operating system that relate to power consumption through the power settings. Although it offers helpful performance-related settings that also apply to desktop users, this is crucial for saving battery life for laptop users.
Follow these procedures to make adjustments to your electricity plan:
- Navigate to Settings > System > Sleep and power.
- To access the Control Panel’s Power Options area, choose Additional power options on the right. Increase the horizontal size of the Settings panel to make this link visible if you can’t see it on the right.
- There are many plans available for selection, such as Balanced, Power Saver, and High Performance. To change a plan, first select the one you want, then click Change plan options on the right.
- Select the duration of time that elapses before the machine goes into sleep mode and the screen shuts off. For further options, click Change Advanced Power Settings.
- You may browse over anything in this section, but make sure to focus on the settings under the categories for the Hard drive, Sleep, Power buttons and lid, Processor power management, and Display.
- To save your changes, click OK.
Adjust the Privacy Settings
Windows 10 gathers a vast amount of data on your usage of the operating system. Although many see this as a privacy violation, it really helps Microsoft enhance its ever improving product. Thankfully, many of the telemetry features may be disabled or reduced.
Turn on the night light
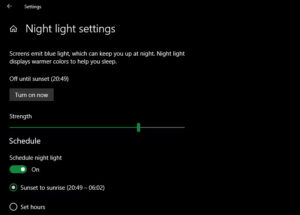
There’s an inbuilt option in Windows 10 that allows your screen to get warmer at night. This lessens the blue light from your computer, which helps you stay alert and protects your eyes when working late.
Go to Settings > System > Display to activate this. To adjust the functionality of the night light, turn on the slider and select Night light settings. The effect’s strength may be changed, and it can be programmed to run automatically from dusk to dawn or at certain hours of your choosing.
Create a Backup Plan for Windows
After completing all of these Windows setup procedures, you wouldn’t want a virus attack or dead hard disc to destroy your machine. To safeguard your data from these and other threats, you must regularly create backups.
Set up Microsoft Defender
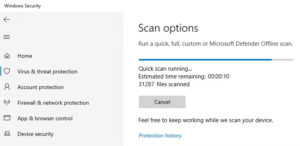
For the majority of users, Microsoft Defender—Windows 10’s integrated antivirus program—is sufficient. As soon as you launch Windows 10, it begins to defend your computer against various dangers. However, it’s a good idea to examine its operation and make adjustments to strengthen your computer’s defences against attacks.
Personalize Windows 10
After installing Windows 10, you should still take the time to personalise your desktop, even if it’s not as crucial as the previous stages. It’s incredible how little customisation touches like a new wallpaper, customised mouse cursor, and other little adjustments can make your system seem like home.
You are no longer left wondering what to do. We’ve covered the necessary steps to complete a clean Windows 10 installation so your machine is prepared for regular usage. The majority of the effort is in the initial setup, however you may still need to make a few minor adjustments here and there.